Creating Custom Document Templates
Overview
The Custom Documents screen is used to generate a Microsoft Word document populated with data from the case you are working with. The screen is called the “Custom Document” screen because you can create these documents as you wish and add them to the system so that they can be used on your cases.
Note: The term “custom document” is used in MIS Professional to describe MS Word document templates that can be populated with case data as described in this help topic. The term “form” is used to describe PDFs that can be populated with case data. For example: Social Security Form SSA-721 is a “form” rather than a “custom document” as its output is PDF. The term “report” is used in MIS Professional to describe a file that organizes and presents system data in a printable format that is easy to analyze. The primary purpose of a report is to analyze business data. Reports are generally for internal use. For example, the “Cases By City” report summarizes at-need cases in a given time period by decedent’s city or residence. Reports can be generated in a number of formats: PDF, Word, Excel, XML. “Custom documents” can be created by the user whereas “forms” and “reports” cannot be created by the user; they can only be created by Batesville staff.
This topic discusses how to create document templates and how to upload them to your system for use.
If you'd like to view and download sample custom template documents, see Custom Document Template Samples for more information.
Work flow
To generate a custom document:
1. First you must obtain a data source file and save it locally. The data source file is a CSV file that contains all the fields from the case that you can use to build your custom document; there are about 500 fields to choose from.
There are 2 ways to obtain a Data Source file:
- Clicking here, (to download a Sample Data Source file)
- By Clicking the View Source button on the Custom Documents screen for any case in your system.
For more information about the fields available, see Custom Document Data Source Definitions.
Create, or use an existing Microsoft Word (.Office 97-2003, or 2007) document.
Connect the data source file that you saved locally in step 1 to your document. (If you are using Office 2007 you will find this option on the Mailings menu: Mailings - Select Recipients - Use Existing List. Other versions of Word may be slightly different.)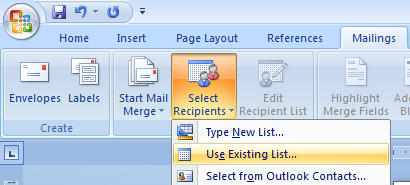
2. Browse to and select the data source file.
3. Enter any information into the document that will not change based on the case.
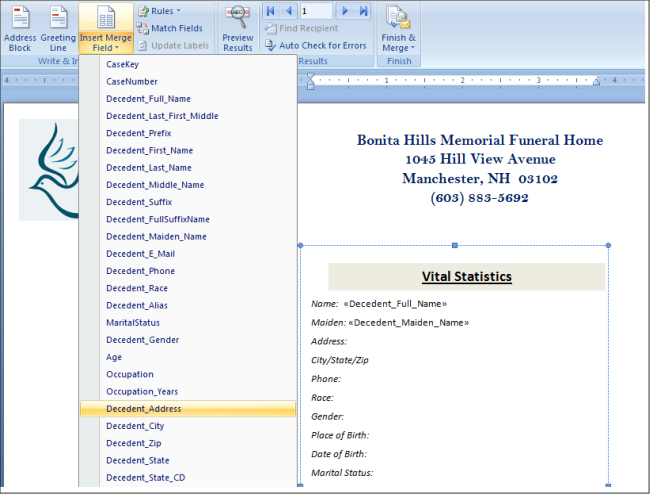
4. Position your cursor in the document where you want a case data merge field to appear.
5. Insert the field by clicking the Insert Merge Field button on the toolbar
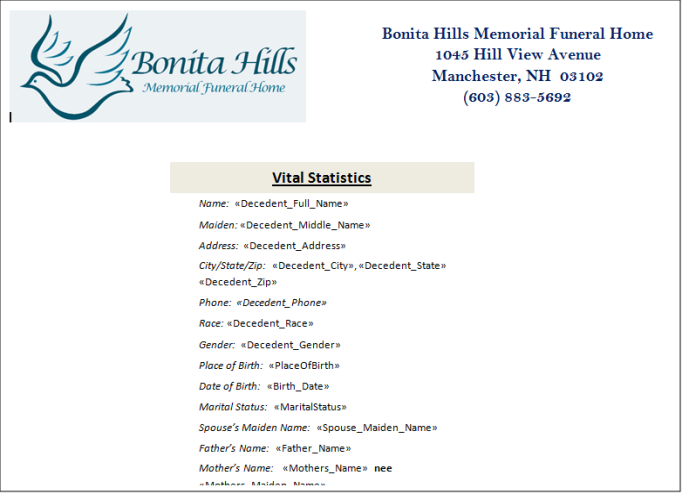
6. Click the field that you want to insert. For example, in the figure below the <<Decedent_Address>> field is being inserted into the file next to the label called “Address:”
7. Repeat steps 4 through 6 for all data fields that you would like to use.
To add a custom document to the system for use:
Note: Once you have finished inserting all of the case data merge fields and have finished your document template, you must upload it to your MIS Professional system.
1. Navigate to the Handout Selection Code Maintenance screen (Administration > Codes > Code Maintenance > Handout Selection).
2. Click Edit to open the Handout Selection Code screen.
3. Click Add.
4. Define the following fields
- Handout Selection Code – Enter a brief unique code for your template (10 characters or less)
- Description – Enter a longer, meaningful description of the document (30 characters or less). This is the description that users will see on the Custom Documents screen.
- Handout Type – Select the type of template you are uploading. (Typical options are: Prayer Card, Memory Folder, etc. These options can be customized.)
- In Drop Down – set to YES
5. Browse to and select your template that you saved locally.
6. Click Save
The document template is now available for usage on the Custom Documents screen
Note: If you upload a docx file, the system converts it to a DOC